¡!¡!¡!¡!¡!¡!¡!¡!¡!¡!¡!¡!¡!¡!¡!¡!¡!¡!¡!¡!¡!¡!¡!¡!¡!¡!¡!¡!¡!¡!¡!¡!¡!¡!¡!¡!¡!¡!¡!¡!¡!¡!¡!¡!¡!¡!¡!¡!¡!¡!¡!¡!¡!¡!¡!¡!¡!¡!¡!¡!¡!¡!
Tuesday, June 30, 2009
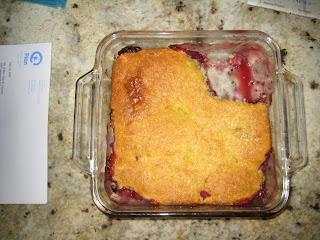
Bootleg rhubarb-cherry cobbler... ish
Actually what this baby turned out to be is more like a tangy, upside-down corn bread. After ix-naying the idea of a pie (post-work and then post-tutoring, it's 9 and I still haven't eaten dinner yet but the rhubarb was going bad and once you let inertia set in....) I decided to make something a little simpler. Also something I could eat with good conscience for breakfast. My boyfriend's house is notoriously lacking in baking staples (witness the bread made with pastry flour that ended up like a giant, sad biscuit), so I ran into the quickee mart while getting gas to grab some Jiffy corn muffin mix and sugar on the way. Bootleg, but what the hell. I am a busy lady. That's the alibi, anyway.
Chopped up the rhubarb (5 stems or so) and threw in some frozen sour cherries for good measure. I love sour fruits, but if you want to go sweeter, a pear or strawberries would go nicely. Toss it in a baking dish with some sugar (I used not a lot-- 1/4 cup or so. Up to 1/2 cup would not be ridiculous) and some flour to soak up the goopy mess. As a consistency whack job, I do not tolerate goopy mess, so I added probably 3 tablespoons of flour. Not really necessary.
Then mix up the muffin mix with an egg and some milk. I added more milk than the box called for (probably half a cup) so that the batter could be in the oven long enough for the fruit to cook. Oh. And I added some sugar (a couple tablespoons) to the corn mix too which was a good call because your cobbler ends up being like 3/4 bread to 1/4 fruit. So a little sweet is good. Pour this on top of the fruit. Bake at 400 for like half an hour. While totally not a cobbler, it is a good breakfast concoction and the sour fruit moistens up the cornbread and the cornbread soaks up the goopy fruity mess. Symbiosis! With Greek yogurt and honey, I actually am a big fan of sour-fruity-cornbread for breakfast. Try it out, teamola.
Monday, June 29, 2009
guest post: dad's chocolate ice cream
Dictated by the great ice cream Kahuna himself. Editor's note: we have an electric bucket style ice cream maker like this:
that works really well. Previous attempts at using an "indoor style" freeze-the-bucket ice cream maker led to ice cream that never really set. If you are young and urban and ice-cream-maker-less, David Lebovitz has a great write up about how to make ice cream without one here. Note well that this recipe makes a ridiculous amount of ice cream. If you want a less ridiculous amount of ice cream, half it.
CHOCOLATE ICE CREAM
1 quart half and half
1 quart heavy cream
2 cups sugar
2 tsps vanilla
8 egg yolks
cocoa powder (always Ghiradelli, here)
Scald the half and half and set aside. If a thin layer of you know, stuff forms, remove it with a wooden spoon. Whisk the egg yolks until they become pale yellow. Add the sugar to the yolks. Slowly add the scalded half and half, a little at a time to the yolk/sugar mix. It is important to do this tempering very slowly so that the eggs are not cooked. This happened once when I added the whole quart at once but if you go slowly, there won't be a problem. Now add the chocolate. Our family goes by the color rather than scientific measurement. We add enough chocolate to produce a light brown color. But it's all in the tasting. When the flavor is exactly what we like, we have achieved our goal. We like it not quite as chocolatey as hot chocolate. It tastes kind of like a Frosty.
Add the quart of heavy cream to the mixture. Now add the vanilla. At this point we add additional Hersheys syrup to make sure that it's chocolatey enough. The key to good ice cream is putting the mixture in the fridge for as long as possible. Overnight yields excellent results because the colder the mixture, the less time is required in the ice cream maker. The result is a creamier ice cream.
At this point, transfer the cold mixture to your favorite ice cream maker.
When the ice cream is done, we consume some of it right away in a soft-serve consistency. The rest we place in plastic containers and put in the freezer where in an hour or two you have a consistency of hard ice cream.
Wednesday, June 24, 2009
no-knead bread
Long overdue!
Making your own bread is the big leagues. By which I mean it is one of those things that is easier than it seems, well worth the time spent, and just an awesome thing that will make you feel like you are the winner of Frontier House... despite the fact that there are no winners on PBS. Seriously, you will want to stalk down Laura Ingalls Wilder in her log cabin and flex your biceps, proudly displaying your perfect, golden loaf until she gives you maple candy or a yard of calico. Homemade bread is like that.
Seriously though, when I started making my own bread junior year of college it was a revelation. Oh, the toast! The sandwiches! The superiority to veggie corn dogs as a midnight snack! Now I am both more busy and more lazy, so I have fallen off the bandwagon.
I did start making the famous, super-hyped, MEGA-hyped no-knead bread earlier this spring. And it is awesome. And you can do it! Yes, you!
I mean, you can totally make your own sandwich bread no worries and it takes less time (white or wheat or HONEY OAT or wahhhh I want to make bread everyday) but this is the only way I have achieved "success" with a "European style loaf." So I guess it's as good a way to start as any.
What other sandwich breads have in "taking an afternoon" and "infinite customizability", this bread has in hands-off cool. This bread is like the James freakin' Dean of crusty boules. Two timings: takin' a day off or the workday warrior. Workday warrior timing is kinda intense, but do-able.
Weekend: late night
Weekday: when you get back from work
Throw 3 cups of flour, 1/4 tsp yeast (store the rest in the fridge) and 1 1/2 tsp salt in a bowl.
Mix with 1 1/2 cups water.
Mix, mix, mix, cover your bowl with saran wrap and go to bed.
12-18 hours later.....
Weekday: If you need to show up at work the next day, set your alarm for 2 hours before you normally get up. Sucks, right? But just think of the bread you'll have with dinner!
Weekend timing: Just get up.
Fold your puffy, bubbly dough over itself a couple times and gently roll it into a ball. Plop it onto a floured cloth or just a floured countertop or a floured bowl or whatever. Cover with a cloth and do something else for 2 hours. Like go back to sleep or watch cartoons.
Back? Good! Preheat the oven to 450 with an oven-proof pot or dutch oven or casserole dish in it. Ideally for half an hour, but it doesn't really matter. Gently maneuver the dough into the hot pot, put the lid on or fashion one out of tinfoil, let it bake for half an hour. Now take the lid off for another 15 minutes or so, until it's golden brown. Fly out the door while your bread cools, or just eat it while you continue to watch cartoons. Oh my god I can't wait to get home and eat this.
Thursday, June 18, 2009
impress your loved ones with cheesy poofs
Otherwise known as savory palmiers... because that sounds much more romantic and less like you are just eating cheesy poofs.
The timing is kind of funny because right after I made these the other night, cheese straws were up on smittenkitchen. Well folks, I have been there and done that. These require less work and look way more presentable (uh, than mine, anyway)... if you need to present them to someone other than your belly.
Cheese puffs
1 sheet puff pastry from the freezer aisle (don't worry about unfolding it, just separate the thirds for cute little cheesy poofs)
some cheddar/gruyere/pecorino & parmesan cheese (I used cheddar because my dad buys it in 1 lb bricks literally every week. Also I am secretly a mouse.)
OK! Preheat the oven to 400.
Roll out each of the thirds so that you get more bang for your buck.
Now grate some cheese on there so that you have a nice layer without going nutso; press the cheese in a little for OPTIMAL distribution.
Ok now pretend you are making palmiers... roll each side into the center. Like so:
They should be kind of adorable. Like all delicious snacks. Uh. I don't know.
Slice the log and put your puffs on a baking sheet-- 15 minutes or so (20, maybe: until they look brownish and delicious) and you're done.
Monday, June 15, 2009
beer milkshakes
While he ate his sandwich and sipped his beer, a bit of conversation came back to him. Blaisedell, the poet, had said to him, "You love beer so much, I'll bet some day you'll go in and order a beer milk shake." It was a simple piece of foolery but it had bothered Doc ever since. He wondered what a beer milk shake would taste like. The idea gagged him but he couldn't let it alone. It cropped up every time he had a glass of beer. Would it curdle the milk? Would you add sugar? It was like a shrimp ice cream. Once the thing got into your head you couldn't forget it. He finished his sandwich and paid Herman. He purposely didn't look at the milk shake machines lined up so shiny against the back wall. If a man ordered a beer milk shake, he thought, he'd better do it in a town where he wasn't known. But then, a man with a beard, ordering a beer milk shake in a town where he wasn't known - they might call the police.
--Cannery Row
------------------------------------------------------------------------------------------------
The lazy, hazy, crazy days of summer have arrived. All I want to do is read, sleep, and drink cold things. Milkshakes. Like Doc from Cannery Row, I have been fixated on beer milkshakes ever since drinking a beer milkshake-like concoction at Radio Bean in Burlington, VT.--Cannery Row
------------------------------------------------------------------------------------------------
View Larger Map
Hip young people, weird old people, a cardboard cactus, wipe the snow off your glasses and swill a frosty Guinness with espresso and maple syrup in the middle of the day. Winter vacations are the best thing in the world, followed by the state of Vermont, followed by beer milkshakes.
Beer milkshake:
-- 1 tall can Guinness / stout
-- 2 generous scoops ice cream (vanilla or Dublin mudslide, please)
Blend.
Monday, June 8, 2009
"Fortune favors the bold" potato salad
Holy overdue post, batman!
This NYTimes article shamed me back to you... but actually, I've been waiting for my NEW DIGITAL CAMERA to come in the mail so that I can be a real food blogger again and not some washed-up old hack who eats ice cream for lunch and picks the cookie crumbs out of her hair on her way to work, wishing that she could eat shit without winding up in the hospital like the other carefree girls and boys. Where were we?
Last night I made some kick-ass potato salad. Thought of y'all because it's summertime and all I want to eat is picnic food. This is healthier, maybe, than the kind you get from the grocery store, plus it's cheaper, plus I winged it so just imagine what will happen when you use your imagination, too! Potato salad for president.
Potato salad
1 bag of waxy red potatoes, about 10
mayonnaise
mustard
a small red onion
olive oil
vinegar (classy wine vinegars probably superior, I used white vinegar I had bought to clean the sink).
Boil the potatoes until they're tender, should take about 15 minutes. While you're waiting, chop up that red onion. I only used half.
Now drain them and let them cool in the fridge while you drink a cold one and contemplate your dwindling work ethic.
Cold-ish? Mash 'em up with a fork and glop in three heaping forkfuls of mayonnaise. Pardon me sir, do you have any Grey Poupon? If so, a spoonful or two is delicious. Stir. Grab the olive oil and vinegar and drizzle them on top for a few counts, like you are a flair bartender with only a very small amount of flair.
Add that red onion and mix it up. Yum. Put on your thinking cap: how good would this be with capers, or dill, or pickles, or.... let me know! Anyway, bring it to work with your sandwich, to the picnic with your slacker friends, to the yacht club with your yacht. It's summer, natch.
Subscribe to:
Posts (Atom)